No edit summary |
No edit summary |
||
| (30 intermediate revisions by 15 users not shown) | |||
| Line 1: | Line 1: | ||
| − | {{techniques|offensive| |
+ | {{techniques|offensive|Continuous Energy Bullet}} |
{{Infobox Technique |
{{Infobox Technique |
||
|name=Continuous Kamehameha |
|name=Continuous Kamehameha |
||
| − | |image= |
+ | |image=File:ContinuousKamehameha.png |
| − | |JapName=連続かめはめ波 |
+ | |JapName=連続かめはめ波 |
| − | |RomName=Renzoku Kamehameha |
+ | |RomName=Renzoku Kamehameha |
| − | |alias='''Continuous Turtle Destruction Wave<br>Renzoku Energy Dan<br>[[Super Energy Wave Volley]]<br>Final Assault<ref name="DBZCCG">''[[Dragon Ball Z Collectible Card Game]]'', 2000</ref>''' |
+ | |alias='''Continuous Turtle Destruction Wave<br>Rapid-Fire Kamehameha<ref name="Daiz7">''[[Daizenshuu 7]]'', 1996</ref><br>Renzoku Energy Dan<br>[[Super Energy Wave Volley]]<br>Final Assault<ref name="DBZCCG">''[[Dragon Ball Z Collectible Card Game]]'', 2000</ref>''' |
|debut=Manga: "[[Premonitions of War]]"<br>Anime: "[[Destination: Guru]]" |
|debut=Manga: "[[Premonitions of War]]"<br>Anime: "[[Destination: Guru]]" |
||
|inventor='''[[Goku]]''' |
|inventor='''[[Goku]]''' |
||
|user='''Goku<br>[[Gohan]]<br>[[Goten]]<br>[[Trunks]]<br>[[W:c:Toriko:Akami|Akami]]''' |
|user='''Goku<br>[[Gohan]]<br>[[Goten]]<br>[[Trunks]]<br>[[W:c:Toriko:Akami|Akami]]''' |
||
| − | |purpose=Offensive |
||
| − | |type=Ki-based |
||
| ⚫ | |||
|color={{color|2ACDEE}} & {{color|FFFFFF}} or {{color|FFF700}} & {{color|FFFFFF}} |
|color={{color|2ACDEE}} & {{color|FFFFFF}} or {{color|FFF700}} & {{color|FFFFFF}} |
||
| ⚫ | |||
|similar='''[[Continuous Super Galick Gun]]<br>[[Full Power Energy Blast Volley]]<br>[[Super Energy Wave Volley]]<br>[[Weekly Special]]''' |
|similar='''[[Continuous Super Galick Gun]]<br>[[Full Power Energy Blast Volley]]<br>[[Super Energy Wave Volley]]<br>[[Weekly Special]]''' |
||
}} |
}} |
||
| − | '''Continuous Kamehameha''' |
+ | {{nihongo|'''Continuous Kamehameha'''|連続かめはめ波|''Renzoku Kamehameha''<ref name="Daiz7">''[[Daizenshuu 7]]'', 1996</ref>|lit. "Continuous Turtle Destruction Wave" or "Continuous Turtle Devastation Wave"}} is a rapid-fire version of the [[Kamehameha]] used by [[Goku]]. |
==Overview== |
==Overview== |
||
| + | Goku fires multiple one-handed Kamehamehas from both hands, inflicting a great deal of damage. Only those who have undergone intense training can unleash this technique.<ref name="Daiz7" /> |
||
| + | |||
| + | ==Usage and Power== |
||
| + | On his way to [[Namek]], Goku uses several Kamehamehas fired one after another during his training; the goal being to try and block each.<ref>''[[Dragon Ball Z]]'' episode 59, "[[Destination: Guru]]"</ref><ref>''[[Dragon Ball Z]]'' episode 60, "[[Bulma's Big Day]]"</ref> He later uses the technique against [[Frieza]] during their battle on Namek. |
||
| + | |||
[[File:428962 223880457701205 191320504290534 479127 1824741359 n.jpg|thumb|left|Super Saiyan Goku fires the Continuous Kamehameha at Cell during the Cell Games]] |
[[File:428962 223880457701205 191320504290534 479127 1824741359 n.jpg|thumb|left|Super Saiyan Goku fires the Continuous Kamehameha at Cell during the Cell Games]] |
||
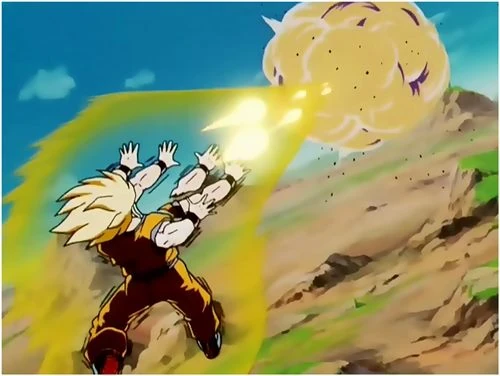
| − | + | He also uses the technique as a [[Super Saiyan]] against [[Cell]] during the [[Cell Games]],<ref>''[[Dragon Ball Z]]'' episode 180, "[[The Fight is Over]]"</ref> as a [[Super Saiyan 3]] against [[Super Buu]] (w/ Gotenks absorbed),<ref>''[[Dragon Ball Z]]'' episode 267, "[[Ready to Fuse?]]"</ref> and as a Super Saiyan 3 as well against [[Kid Buu]]. |
|
[[File:19-73.jpg|thumb|Goku firing the attack at General Rilldo]] |
[[File:19-73.jpg|thumb|Goku firing the attack at General Rilldo]] |
||
| − | Adult [[Gohan]] uses the technique as |
+ | Adult [[Gohan]] uses the technique as a [[Super Saiyan 2]] to blast the [[Sealed Ball]] where [[Innocent Buu|Majin Buu]] is locked in an attempt to destroy him before his release, firing several [[Electric Kamehameha]]s.<ref>''[[Dragon Ball Z]]'' episode 232, "[[Buu is Hatched]]"</ref> |
| + | |||
| ⚫ | Much later, Goku uses the energy wave barrage against the [[Sigma Force]], which [[Liquefaction|remains hidden into the metallic structure]] of [[Dr. Myuu]]'s tower.<ref>''[[Dragon Ball GT]]'' episode 18, "[[Unexpected Power]]"</ref> Soon after, he uses the technique two times in his fight against [[General Rilldo]] on the planet [[M-2]].<ref>''[[Dragon Ball GT]]'' episode 19, "[[A General Uprising]]</ref> Goten uses a continuous attack during his short fight against [[Baby]], right before attacking it with his [[Super Goten Strike]].<ref>''[[Dragon Ball GT]]'' episode 26, "[[Saiyan Hunting]]"</ref> Goku later uses a variant named '''Final Assault'''<ref name="DBZCCG" /> to finish off [[Super 17]].<ref>''[[Dragon Ball GT]]'' episode 46, "[[Raising the Stakes]]"</ref> |
||
| + | |||
| ⚫ | |||
| + | In ''[[Dragon Ball Z: The World's Strongest]]'', Goku also uses this technique to destroy the moving spiked balls in [[Wheelo's fortress]]. |
||
| + | |||
| + | In ''[[Dragon Ball Z: Lord Slug]]'', [[Pseudo Super Saiyan]] Goku uses the attack against [[Lord Slug]]. |
||
| + | |||
| + | In ''[[Dragon Ball Z: Bio-Broly]]'', the Super Saiyans [[Goten]] and [[Trunks]] fire continuous [[Friend Kamehameha]] waves at [[Bio-Broly]]. |
||
| + | |||
| + | In ''[[Dragon Ball Z: Fusion Reborn]]'', Super Saiyan Goten uses the technique alongside Super Saiyan Trunks' [[Renzoku Energy Barrage]] against [[The Dictator]]'s [[Zombie]] army. |
||
| + | ==Other Media== |
||
| ⚫ | |||
| + | In the ''[[Dream 9 Toriko & One Piece & Dragon Ball Z Super Collaboration Special]]'', Goku uses the attack when fighting the monster [[W:c:Toriko:Akami|Akami]], and Akami [[Mimicry|copies]] and later uses it against [[W:c:Toriko:Toriko|Toriko]]. |
||
| + | ==Video Game Appearances== |
||
| ⚫ | |||
| − | The technique appears under the generic name '''Renzoku Energy Dan''' in the [[Dragon Ball Z: Butōden (series)|''Butōden'' series]]. It was named Continuous Kamehameha in the [[Dragon Ball Z: Budokai (series)|''Budokai'' |
+ | The technique appears under the generic name '''Renzoku Energy Dan''' in the [[Dragon Ball Z: Butōden (series)|''Butōden'' series]]. It was named Continuous Kamehameha in the [[Dragon Ball Z: Budokai (series)|''Budokai'' series]], where it can also be used by Adult Gohan and Goten in addition to Goku and can be finished with a large [[Ki Blast]] (since ''[[Dragon Ball Z: Budokai 2]]''). It appears under the generic name '''[[Super Energy Wave Volley]]''' in the [[Dragon Ball Z: Budokai Tenkaichi (series)|''Budokai Tenkaichi'' series]]. It also appears in ''[[Dragon Ball Z: Battle of Z]]'', where Goku uses it in his Super Saiyan and Sage Mode (aka Naruto Custom) forms. |
==Gallery== |
==Gallery== |
||
| Line 65: | Line 80: | ||
Goku Vs. Rilldo.JPG|Goku charges ''ki'' in his hand |
Goku Vs. Rilldo.JPG|Goku charges ''ki'' in his hand |
||
19-57.jpg|Goku blasts Rilldo |
19-57.jpg|Goku blasts Rilldo |
||
| + | dbgt33-10.png |
||
| + | dbgt33-11.png |
||
| + | dbgt33-08.png |
||
GT205.JPG|Goku's Continuous Kamehameha is blocked by Hyper Meta-Rilldo's Energy Shield |
GT205.JPG|Goku's Continuous Kamehameha is blocked by Hyper Meta-Rilldo's Energy Shield |
||
Vlcsnap-2011-10-22-21h34m08s201.png|Goten firing Continuous Kamehameha at Baby |
Vlcsnap-2011-10-22-21h34m08s201.png|Goten firing Continuous Kamehameha at Baby |
||
| Line 86: | Line 104: | ||
UT Continuous Kamehameha 2.JPG|Goku's Super Energy Wave Volley in ''Ultimate Tenkaichi'' |
UT Continuous Kamehameha 2.JPG|Goku's Super Energy Wave Volley in ''Ultimate Tenkaichi'' |
||
Spark2.JPG|Super Saiyan Goku's Continuous Kamehameha in ''Battle of Z'' |
Spark2.JPG|Super Saiyan Goku's Continuous Kamehameha in ''Battle of Z'' |
||
| + | |||
</gallery> |
</gallery> |
||
}} |
}} |
||
| Line 93: | Line 112: | ||
[[Category:Techniques]] |
[[Category:Techniques]] |
||
[[Category:Offensive techniques]] |
[[Category:Offensive techniques]] |
||
| − | [[Category: |
+ | [[Category:Energy waves]] |
[[Category:Energy barrage techniques]] |
[[Category:Energy barrage techniques]] |
||
Revision as of 10:53, 31 August 2019
Directory: Techniques → Offensive Techniques → Continuous Energy Bullet
Continuous Kamehameha (連続かめはめ波 Renzoku Kamehameha[1], lit. "Continuous Turtle Destruction Wave" or "Continuous Turtle Devastation Wave") is a rapid-fire version of the Kamehameha used by Goku.
Overview
Goku fires multiple one-handed Kamehamehas from both hands, inflicting a great deal of damage. Only those who have undergone intense training can unleash this technique.[1]
Usage and Power
On his way to Namek, Goku uses several Kamehamehas fired one after another during his training; the goal being to try and block each.[3][4] He later uses the technique against Frieza during their battle on Namek.

Super Saiyan Goku fires the Continuous Kamehameha at Cell during the Cell Games
He also uses the technique as a Super Saiyan against Cell during the Cell Games,[5] as a Super Saiyan 3 against Super Buu (w/ Gotenks absorbed),[6] and as a Super Saiyan 3 as well against Kid Buu.


Goku firing the attack at General Rilldo
Adult Gohan uses the technique as a Super Saiyan 2 to blast the Sealed Ball where Majin Buu is locked in an attempt to destroy him before his release, firing several Electric Kamehamehas.[7]
Much later, Goku uses the energy wave barrage against the Sigma Force, which remains hidden into the metallic structure of Dr. Myuu's tower.[8] Soon after, he uses the technique two times in his fight against General Rilldo on the planet M-2.[9] Goten uses a continuous attack during his short fight against Baby, right before attacking it with his Super Goten Strike.[10] Goku later uses a variant named Final Assault[2] to finish off Super 17.[11]
Film Appearances
In Dragon Ball Z: The World's Strongest, Goku also uses this technique to destroy the moving spiked balls in Wheelo's fortress.
In Dragon Ball Z: Lord Slug, Pseudo Super Saiyan Goku uses the attack against Lord Slug.
In Dragon Ball Z: Bio-Broly, the Super Saiyans Goten and Trunks fire continuous Friend Kamehameha waves at Bio-Broly.
In Dragon Ball Z: Fusion Reborn, Super Saiyan Goten uses the technique alongside Super Saiyan Trunks' Renzoku Energy Barrage against The Dictator's Zombie army.
Other Media
In the Dream 9 Toriko & One Piece & Dragon Ball Z Super Collaboration Special, Goku uses the attack when fighting the monster Akami, and Akami copies and later uses it against Toriko.
Video Game Appearances
The technique appears under the generic name Renzoku Energy Dan in the Butōden series. It was named Continuous Kamehameha in the Budokai series, where it can also be used by Adult Gohan and Goten in addition to Goku and can be finished with a large Ki Blast (since Dragon Ball Z: Budokai 2). It appears under the generic name Super Energy Wave Volley in the Budokai Tenkaichi series. It also appears in Dragon Ball Z: Battle of Z, where Goku uses it in his Super Saiyan and Sage Mode (aka Naruto Custom) forms.
Gallery
") Goku charges Continuous Kamehameha ") Goku blasting Continuous Kamehameha ") Goku blocks his Kamehameha waves ") Goku firing Kamehameha waves ") Goku's Kamehameha .png "Continuous Kamehameha (1).png (45 KB)") Goku's Continuous Kamehameha fired at Frieza ") Goku fires blasts in Wheelo's fortress ") Moving spike balls destroyed by Goku's attack ") Goku blasts spike balls with the attack ") Spike balls destroyed by the Continuous Kamehameha ") Goku's Continuous Kamehameha in The World's Strongest ") Goku fires the attack at Lord Slug ") False Super Saiyan Goku's Continuous Kamehameha ") Goku fires a Continuous Kamehameha at Android 13 ") Goku's energy bullets ") Goku's attack causes explosions ") Goku blasts Cell with Continuous Kamehameha ") Cell's Perfect Barrier blocks Goku's Continuous Kamehameha ") Gohan firing Continuous Kamehameha at Buu's Sealed Ball ") Gohan's Continuous Kamehameha fired at Buu's Sealed Ball ") Goten and Trunks charge Continuous Kamehamehas ") Goten and Trunks fire their Continuous Kamehamehas at Bio-Broly ") Goten and Trunks their attacks at Bio-Broly ") Goten charges Continuous Kamehameha ") Goten's Continuous Kamehameha blasts the Zombies ") Goku's attack fired at Super Buu (w/ Gotenks absorbed) ") Goku fires a Continuous Kamehameha at Super Buu ") Goku uses the attack against Akami in the Super Collaboration Special ") Akami's copied attack fired at Toriko in the Super Collaboration Special ") Goku prepares a barrage of energy waves to fire at the Sigma Force ") Goku's Continuous Kamehameha fired at the Sigma Force ") Goku charges ki in his hand ") Goku blasts Rilldo ") ") ") ") Goku's Continuous Kamehameha is blocked by Hyper Meta-Rilldo's Energy Shield ") Goten firing Continuous Kamehameha at Baby ") Gohan fires a pink Continuous Kamehameha at Vegeta ") GT Goku's Renzoku Energy Dan in Final Bout ") Continuous Kamehameha in Budokai 1 ") Continuous Kamehameha in Budokai 2 ") Continuous Kamehameha in Budokai 2 ") Goku finishes off the attack with a large Ki Blast ") Goku charging the attack in Budokai 3 HD ") Goku fires the attack in Budokai 3 HD ") Goku fires his Continuous Kamehameha in Supersonic Warriors 2 ") Goku's Continuous Kamehameha in Infinite World ") Gohan's Continuous Kamehameha in Infinite World ") Goten's Continuous Kamehameha in Infinite World ") GT Goku uses the attack in Infinite World ") Goku's Super Energy Wave Volley in Budokai Tenkaichi ") Goku's Super Energy Wave Volley in Budokai Tenkaichi ") Goku's Super Energy Wave Volley in Budokai Tenkaichi 3 ") Goku prepares a Super Energy Wave Volley in Ultimate Tenkaichi ") Goku's Super Energy Wave Volley in Ultimate Tenkaichi ") Super Saiyan Goku's Continuous Kamehameha in Battle of Z |
References
- ↑ 1.0 1.1 1.2 Daizenshuu 7, 1996
- ↑ 2.0 2.1 Dragon Ball Z Collectible Card Game, 2000
- ↑ Dragon Ball Z episode 59, "Destination: Guru"
- ↑ Dragon Ball Z episode 60, "Bulma's Big Day"
- ↑ Dragon Ball Z episode 180, "The Fight is Over"
- ↑ Dragon Ball Z episode 267, "Ready to Fuse?"
- ↑ Dragon Ball Z episode 232, "Buu is Hatched"
- ↑ Dragon Ball GT episode 18, "Unexpected Power"
- ↑ Dragon Ball GT episode 19, "A General Uprising
- ↑ Dragon Ball GT episode 26, "Saiyan Hunting"
- ↑ Dragon Ball GT episode 46, "Raising the Stakes"